Poco, the ex-Xiaomi sub-brand, is criticized for offering similar smartphones to Redmi. However, the Poco X series has figured to carve out its own identity. A few months back, when Poco X2 was revealed, it was considered the cheapest smartphone to offer a 120Hz display, quad-cameras, and huge battery life. But the all-new Poco X3 NFC brings some similar features with enhancement in some aspects. This article will guide you to download and install TWRP Recovery on Poco X3 NFC (codename: Surya) using ADB and Fastboot commands.
Remember that before flashing a custom recovery, it is necessary to unlock the bootloader of your Poco X3. Since most Android OEMs come with a locked bootloader, it is mandatory to unlock it at first. However, this increases the security risks on your Android device. But it also assists you in flashing any third-party files on your mobile. Most importantly, installing a TWRP custom recovery has many advantages. For example, you can root your Android phone, take a Nandroid backup and restore, flash custom ROMs, etc.
Additionally, you can also use TWRP to install Android stock ROM, increase internal storage, and flash custom mods and kernels. Due to its multiple features, TWRP, aka TeamWin Recovery Project, is always preferred over CWM. Although many users consider Orange Fox Recovery over TWRP, this TeamWin recovery is still readily available for any smartphone OEM. Moreover, this recovery has a touch-based interface which is an additional bonus. There are tons of methods to flash TWRP on Poco X3 NFC.
You can use the TWRP Manager, Flashify, or ADB and Fastboot commands. Using the official TWRP app is also a great alternative. This way you can easily get the latest version updates as soon as possible. Besides, there is also a way to install TWRP without a PC and root. But, it does not work on every Android mobile. In this tutorial, we’ll show you some simple and easy steps to flash TWRP recovery on Poco X3 NFC using CMD and ADB & Fastboot commands. All thanks to mahajant99, a member of the XDA forum.
How to Flash TWRP recovery on Poco X3 NFC
Interested users may proceed to our easy steps guide on how to flash TWRP on the Xiaomi Poco X3 NFC smartphone. Let’s get started.
Disclaimer
Do this at your own risk. Droid Thunder will not be responsible for any damage that happens to your Poco X3 by following this guide.
Things To Do
- Back up your important phone data such as contacts, messages, apps, etc.
- To avoid interruption, charge your mobile to a minimum of 60%.
- Since we’ll use a PC in this process, install the Poco USB drivers.
- Unlock the bootloader of Poco X3 before moving to the TWRP guide.
How to enable USB debugging and OEM unlock
- Open your mobile Settings.
- Click on the About Phone section.
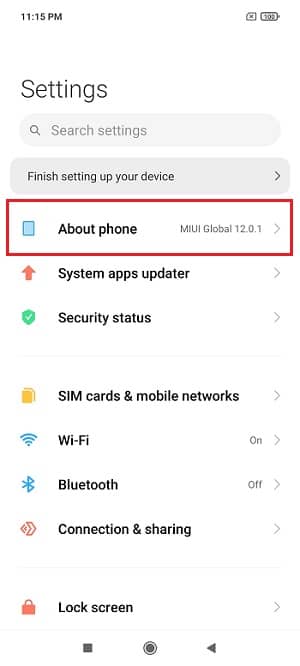
- Scroll down and tap on the MIUI version 7 times
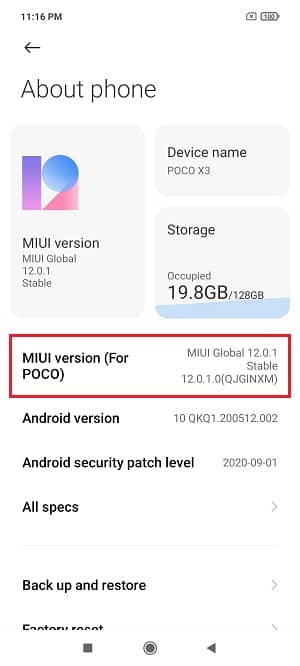
- This will show a countdown message saying, “You’re 4,3,2,1 steps away from being a Developer”.
- Finally, a message saying, You are now a developer will appear.
- This will enable the hidden developer option.
- Go back to settings and open Additional Settings.
- Scroll down and click on the Developer options.
- Under Developer options, turn on the OEM Unlocking option.
- Similarly, scroll down and turn on the USB debugging.
Downloads
How to install TWRP Recovery on Poco X3
- Install the ADB drivers on the computer.
- Download and extract the TWRP recovery.zip file on your PC.
- You’ll see the TWRP 3.4.0-0 By mahajant99.img file in the extracted folder.
- Rename the TWRP 3.4.0-0 By mahajant99.img file as ‘twrp.img‘.
- Copy this TWRP.img file to the location (where you’ve installed the ADB and Fastboot drivers.
- For example C:\Program Files\Minimal ADB and Fastboot folder.
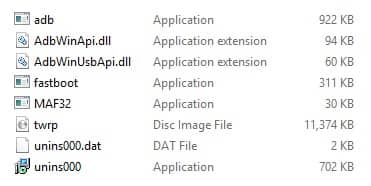
- On the other hand, use a Type-C cable and connect your Poco X3 to the PC.
- Inside the C:\Program Files\Minimal ADB and Fastboot folder, hold your keyboard’s Shift button and right mouse click.
- Click on the Open command window here from the list of options.
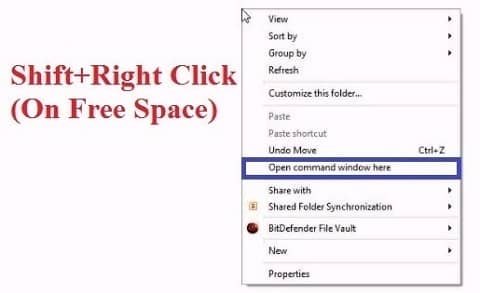
- This will open the CMD window on your PC screen.
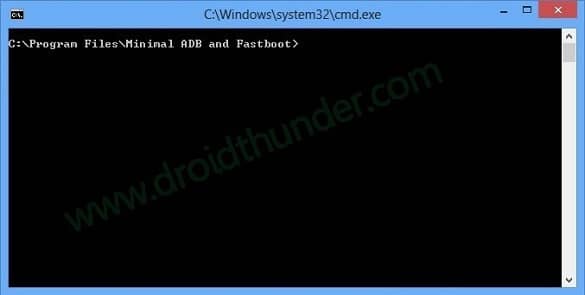
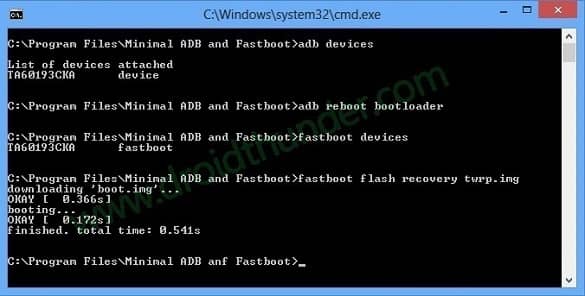
- Now, let’s type the below commands one after another in the cmd window:
adb devices
- Type the command and press the enter key on your keyboard.
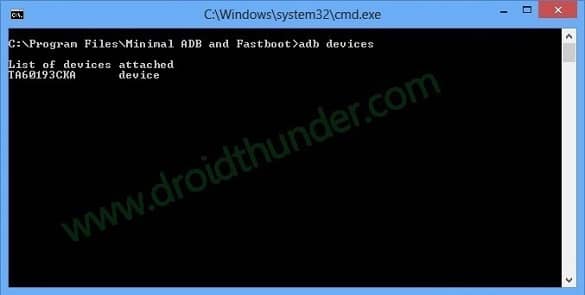
- This will show a message saying, ‘List of devices attached.’
- That means you have established a successful connection between your phone and the PC.
- If this doesn’t happen, install the Xiaomi Poco X3 USB drivers again.
- If the problem persists, change your USB cable or the USB port.
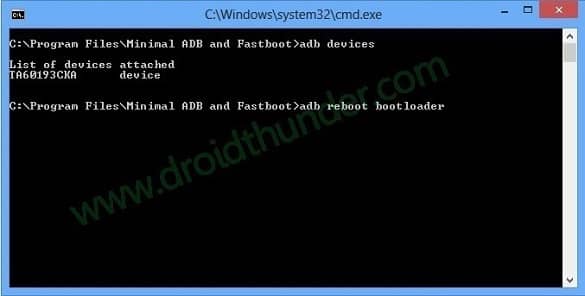
- Let’s now boot your Poco X3 into Fastboot mode.
- For that, type the following command and hit the enter key:
adb reboot bootloader
- This will restart your Poco handset into Fastboot mode.
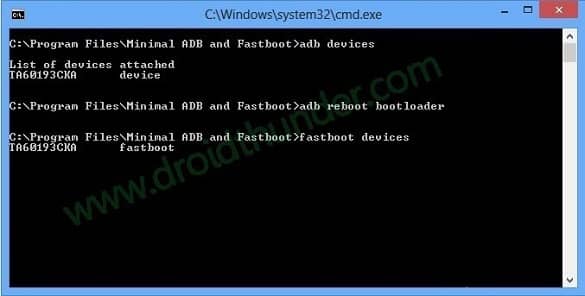
- Let’s now confirm whether Fastboot is functional or not.
- Hence, enter the below command:
fastboot devices
- A few numbers will appear on the screen, confirming that Fastboot is functional.
- Finally, let’s begin the Poco X3 TWRP recovery flashing process.
- To do so, enter the below command:
fastboot flash recovery twrp.img
- As soon as you press the enter key, the TWRP recovery installation will start.
How to Boot Poco X3 into TWRP recovery mode
- Power off your Poco X3.
- Press and hold the Volume up key + Power key altogether until the recovery mode appears.
- As soon as the TWRP logo appears, leave both buttons.
- Great! This is how you can reboot Poco X3 into TWRP recovery mode.
- Unfortunately, if you cannot boot the phone into recovery mode, use the TWRP Manager application.
Conclusion
Finally! This is how you can successfully install the latest TWRP 3.4.0-0 custom recovery on your Xiaomi Poco X3 NFC without root. In case of any problems, kindly use the comment box below.
Source: XDA


1 thought on “Install TWRP Recovery on Poco X3 NFC”
Poco x3 nfc miui13 android 13 img work?